
When I did up my pinkeep, I knew the way I was doing it was not the usual way that it should be done. I could not recall the link that BJ gave at NNC earlier that showed how to do up a pinkeep. So, using my own imagination, I did mine in a way that was different, but not that far off! LOL! The link which BJ eventually gave again (thanks, BJ!) needed some sewing to be done. Mine is sew-free! Just used craft glue. LOL!
It does not look too bad *grin*, although it does look kind of bulky. One thing for sure, since I used compressed polystrene in place of the should be batting, my pinkeep can actually be poked with pins even on the front, not just the sides. *grin*
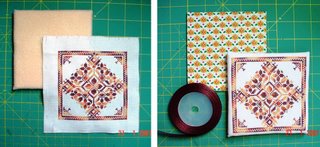
Just in case someone should be interested *wink* to do one in the way I did mine, here are the materials, although I missed out the ribbons when I took this photo.
 I wrapped felt material over the polystyrene board because I am uncertain as to whether polystyrene is acid free or not. By wrapping with felt material, I hope to protect my stitching from having direct contact with the board. Next, I wrapped my stitching over the felt material. After wrapping the cotton fabric over the backing board, I glued both front and back pieces together.
 When that is done, the ribbon goes next around the almost completed pinkeep, using double sided tape. This is, of course, followed by the pins around all four sides of the pinkeep, and taa daaa! The finished pinkeep.....with a difference! See! No sewing needed! LOL!
It does not look too bad *grin*, although it does look kind of bulky. One thing for sure, since I used compressed polystrene in place of the should be batting, my pinkeep can actually be poked with pins even on the front, not just the sides. *grin*
Just in case someone should be interested *wink* to do one in the way I did mine, here are the materials, although I missed out the ribbons when I took this photo.
 I wrapped felt material over the polystyrene board because I am uncertain as to whether polystyrene is acid free or not. By wrapping with felt material, I hope to protect my stitching from having direct contact with the board. Next, I wrapped my stitching over the felt material. After wrapping the cotton fabric over the backing board, I glued both front and back pieces together.
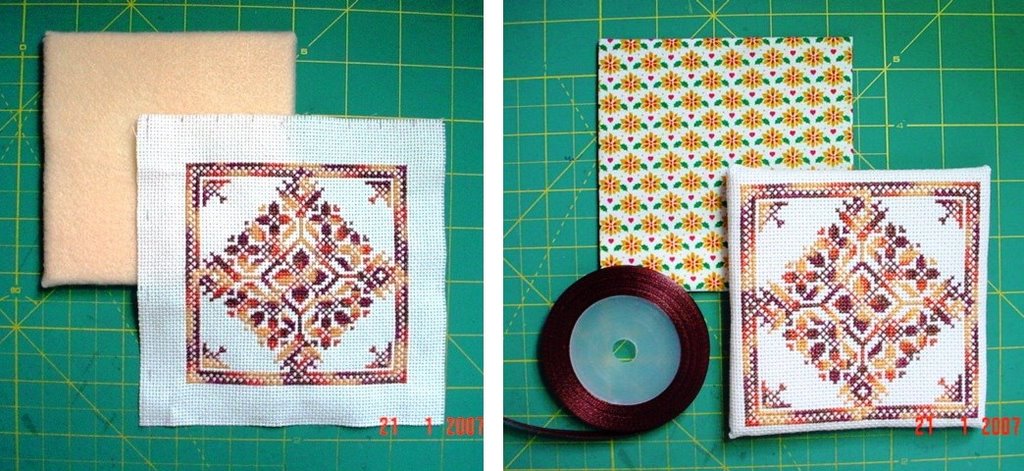 When that is done, the ribbon goes next around the almost completed pinkeep, using double sided tape. This is, of course, followed by the pins around all four sides of the pinkeep, and taa daaa! The finished pinkeep.....with a difference! See! No sewing needed! LOL!
3 comments:
That's a lovely lovely pinkeep. And the colours are so vibrant!! I like the ribbon colours too, a unique combo indeed. Well done for a pinkeep...with a difference ;)
What a beautiful pinkeep you have made! Everything just matches so nicely.
Your things are lovely....thank you so much for sharing !
Debbie
Two Old Crows (www.2oldcrows.com)
Post a Comment